

 Resto
Resto Balance
 Feral
Feral


Resto Druid Spells
Now that we've covered the user interface, I want to go into depth on the arsenal of spells available to us.
I made this flowchart a while back to vaguely explain resto raiding. Click to enlarge.
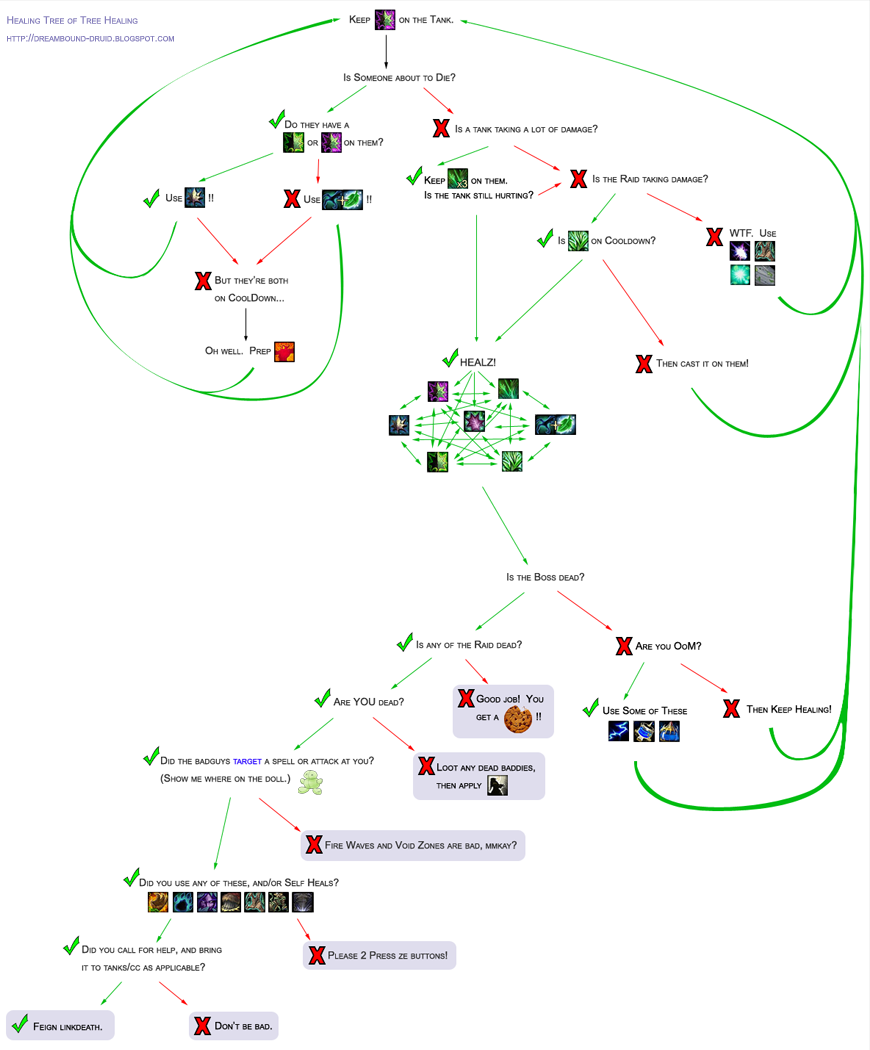
As you can tell by the knot of HEALZ! spells, healing as a resto druid is so flexible and variable that it is difficult to define. The best you can do is learn how each spell works, keep an eye on how fast your raid is dropping, and learn to quickly determine what heal fits best at that moment, around cooldowns!
The Heals:
Rejuvenation:
This is our go-to heal, currently. Instant-cast single-target HoT.
- Relatively slow-ticking
- Boosts Nourish
- Makes a target eligible for Swiftmend
- Can proc Revitalize if talented
Swiftmend:
Instant-cast direct heal on a target with either a rejuv or regrowth active on them. Decently sized heal, our primary "direct heal," though it does have a cooldown. Use it frequently.
- If glyphed, will not consume the HoT
- 15-second cooldown
- Crittable.
Wild Growth:
Instant-cast AoE HoT: use on a cluster of 2+ players who need something more than a rejuvenation. This is just like a priest's Circle of Healing, only it is applies a HoT rather than a direct heal.
- If glyphed, it will hit up to 6 players.
- Can be cast on enemies to heal nearby raid members.
- Boosts Nourish
- Can proc revitalize if talented
- I have a detailed guide on its use here (with diagrams).
Nourish:
Our primary direct heal after Swiftmend: use it when Swiftmend is on cooldown. It is boosted by the number of HoTs you already have rolling on your target.
- Boosted by your: Rejuv, Regrowth, Lifebloom, and Wild Growth
- Is more powerful the more HoTs you have on the target
- Is NOT boosted by other players' HoTs on the target
- Same base cast-time as your GCD
- Does require you to stop moving to cast.
 Lifebloom:
An insta-cast HoT that ticks quickly and has a back-loaded "bloom" heal at the end. It is probably the most difficult healing spell to get comfortable using.
- Boosts Nourish
- Stacks up to three times on a single target, growing stronger with each stack.
- Can be "rolled" by casting a new lifebloom on the target before the stack blooms.
- Refunds half the mana cost when it blooms, but only the first 3 in the stack are refunded. Thus, rolling a stack is more mana-expensive than letting it bloom.
- Roll a stack only if you are sure you have the mana to maintain it, and wait until the last possible deci-second to roll it to make the most of its healing.
- Mostly used on tanks.
- Ticks more quickly than rejuvenation, so can be used as a quicker raid heal as well.
Regrowth:
A heal with a slower cast time that puts not only a direct heal on the target, but also a HoT. The HoT portion lasts longer than a Rejuv in most cases.
- Boosts Nourish
- Relatively mana-expensive and slow-casting.
- If you plan to spam this spell, glyph it.
- If unglyphed, use mostly on tanks to buff nourish and provide another HoT.
Healing Touch:
This is a slow but heavy direct heal. Most level 80 druids will only use this when paired with Nature's Swiftness to make it insta-cast, as a 2-minute cooldown emergency heal.
- Very mana-expensive
- Mostly used as a leveling heal before learning Nourish
- NS+HT emergency heal works best when macroed together, as NS does not pop the GCD by itself.
Tranquility:
This spell is mostly outdated by wild growth. You may find some use for it situationally, particularly in 5-man heroics. It is a very powerful healing spell, but its usefulness is limited to your party, and only those party members close enough to you to receive it: it also has a channeling time that will cause your HoTs to drop while you are casting it.
- Party only
- Channeled, long casting time that is interruptable
- Long cooldown
Other Spells:
 Cleansing:
Druids can remove curses and poisons from friendly players.
Cleanse debuffs quickly, prioritizing those people who are most effected by that particular debuff. Learn about the curses and poisons that are cast by the mobs and bosses in the instances you run, and learn what they do:
- If a curse is limiting the amount of healing received by the target (such as spider wing trash in Naxx), then the tanks and people who are low-health should be your cleansing priority.
- If a curse applies healing to the mob whenever the afflicted player attacks (such as the giant dragonkin in Sarth), then prioritize those players with fast attack speeds and leave the healers for last on the cleanse-list.
- If a poison is sapping mana from a healer or someone nearly OoM, cleanse it quickly!
 Innervate and Mana:
If you are running low on mana, it is okay to keep your innervate for yourself.
While +spellpower is the strongest stat you can buff/gem/enchant for and you want to try to reach the haste soft-cap for your 1-second GCD, don't skimp on the spirit or mp5. Intensity is required for resto builds for a reason, beyond opening up Nature's Swiftness. Keep an eye on your own mana, and make sure you don't throw your innervate to someone else before you know whether or not you'll need it for yourself.
- Use mana pots as a last resort, since you can only use one per fight.
- Use your mana trinkets -- you can macro a trinket + Rejuvenation combo to keep from having to waste a GCD in the rotations, if you have a click-use mana trinket.
- You jump into melee and start punching things for OoC procs. Use these clearcasting procs to throw a lifebloom to someone, and let it bloom: it will refund you 14% base mana on the bloom, even though you spent no mana to cast it!
 Defenses:
Always remember your defensive spells: these can save your life.
Shapeshifting:
This is a very useful ability. Shifting between forms will break you out of root abilities as well as polymorphs. Just remember that while in feral forms, you are succeptible to beast sleeps/hibernate, and while in tree form, you can be banished by warlocks.
Barkskin:
1 minute cooldown on a personal shield that will also make you immune to spell pushback. In raiding, it is useful to protect yourself from heavy AoE or sudden aggro.
Cyclone:
A short-duration banishment effect that can be useful in various mind-control situations, or as a temporary CC when adds in a trash pull get out of control. Casting it will take you out of tree form.
Nature's Grasp:
Insta-cast buff on yourself that will root the next thing that hits you. Once it is rooted, run away from it. It does have a cooldown.
Entangling Roots:
Nature's Grasp, in targeted-cast form. Has no cooldown, but is subject to the same diminishing returns as Nature's Grasp.
Hibernate:
Useful against any kind of beast or dragonkin, including enemy feral druids, ghost wolf shaman, and hunter pets!
Racial Abilities:
Be it warstomp or shadowmeld or some new troll/worgen ability, remember that they are there and useful.
Profession Items:
As a leatherworker, I carry Drums of Panic that create a short-duration aoe fear centered on me. Other professions may have items useful for you as well.
Soothe Animal:
...
...
Yeah I don't know what the point of this is besides maybe for herbalists.
In the next section, I will discuss in more depth the mechanics of resto healing.

