Friday, June 26, 2009

Resto Healing Flowchart

A couple months ago, I stumbled across this post from Runycat at Unbearably HoT. I laughed myself to nausea (I had the flu at the time), posted it on my guild forums, and then thought to myself... there needs to be one for resto, too.

So I made one. Click to enlarge! :)


With that, I am leaving for a week's vacation. I may or may not post in that time. Laters! :D

Wednesday, June 24, 2009

Situational Awareness!

Lissanna at Restokin posted about this a couple weeks back, and it was moved over to a Blog Azeroth shared topic across the blogs. I figure I'll flesh out the comments I made to her original post with some additional details and formatting that a comments window can't easily do :)

While back in the days of MC and BWL, it was generally okay for a player to get tunnel-vision while playing whack-a-mole or flailing at a stationary boss. There were a few exceptions, like not standing in the lava, or by Onyxia's tail, or in the cleave range, or in the bombs being thrown by the goblin trash, or in LoS of Firemaw as a healer, or the odd dance that was done for Chromaggus, but those bosses had NOTHING on Sartharion+Drakes, Heigan, Thaddius, KT, Hodir, Mimiron, Vezax to name a few!

Contents Quicklinks:

Your UI

Your UI is one of the most important pieces for situational awareness. What makes a mod useful is how much more easily it will provide you important information; thus, how you set up your mods and UI really determines how well the mods do their job and get you that information without making things distractingly worse. Sometimes, adding mods can make your job more difficult than it was when you were running an unmodded UI, if they aren't set up well!

Key things to consider are:
  • Can you easily see your raid frames?
  • Can you easily see your own character?
  • Can you easily see the debuffs?
  • Can you easily see raid warnings?
  • Can you easily see your surroundings?
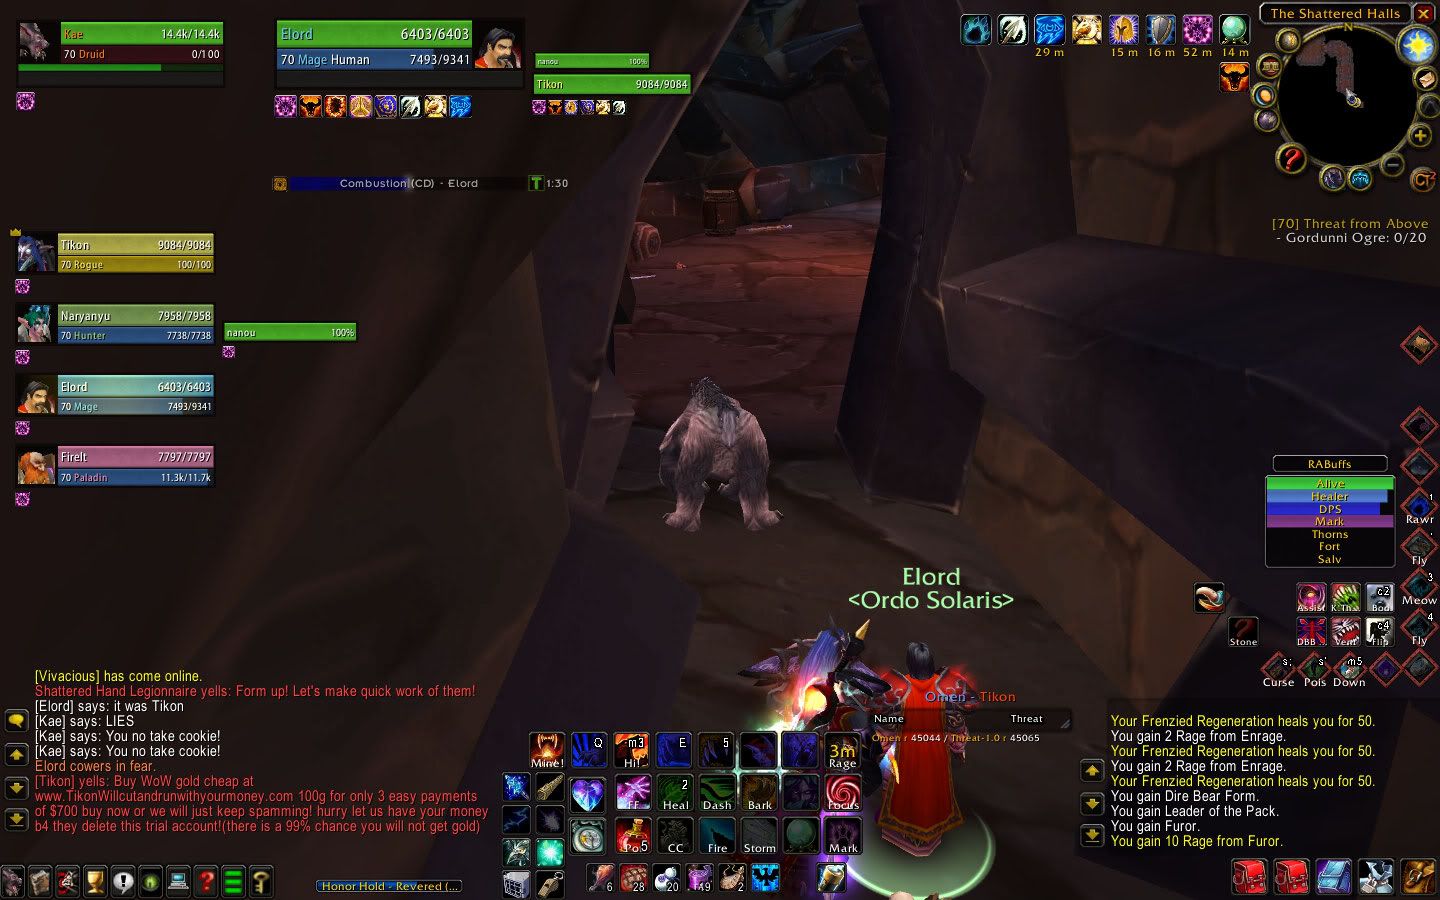
For example, here is a screenshot of my UI from back in the BWL days.


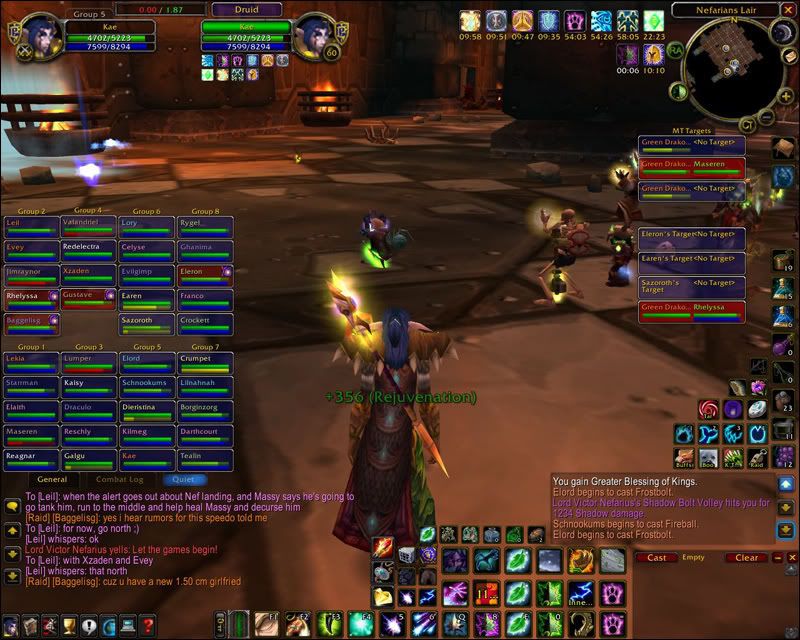
You can see how I made an effort to organize my action bars, and this is even before the days of "needing" a spot for a threat meter! I was very proud of this UI, though I gag at it now :) It 
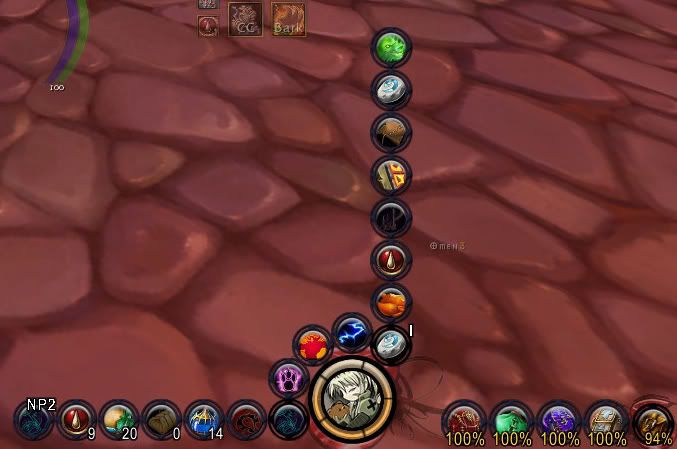
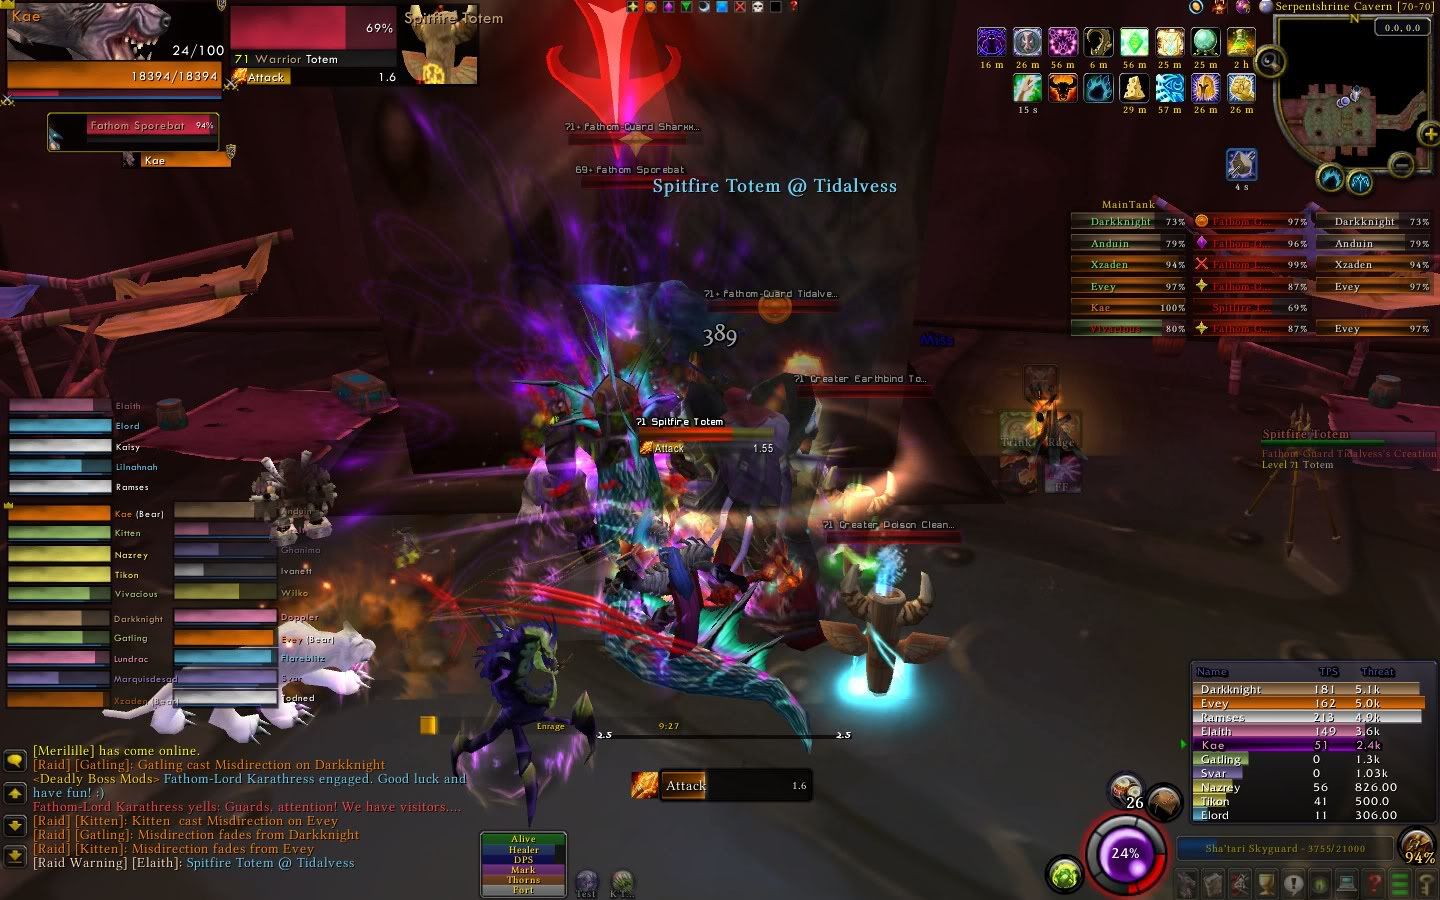
slowly morphed over time to what is now my current UI:


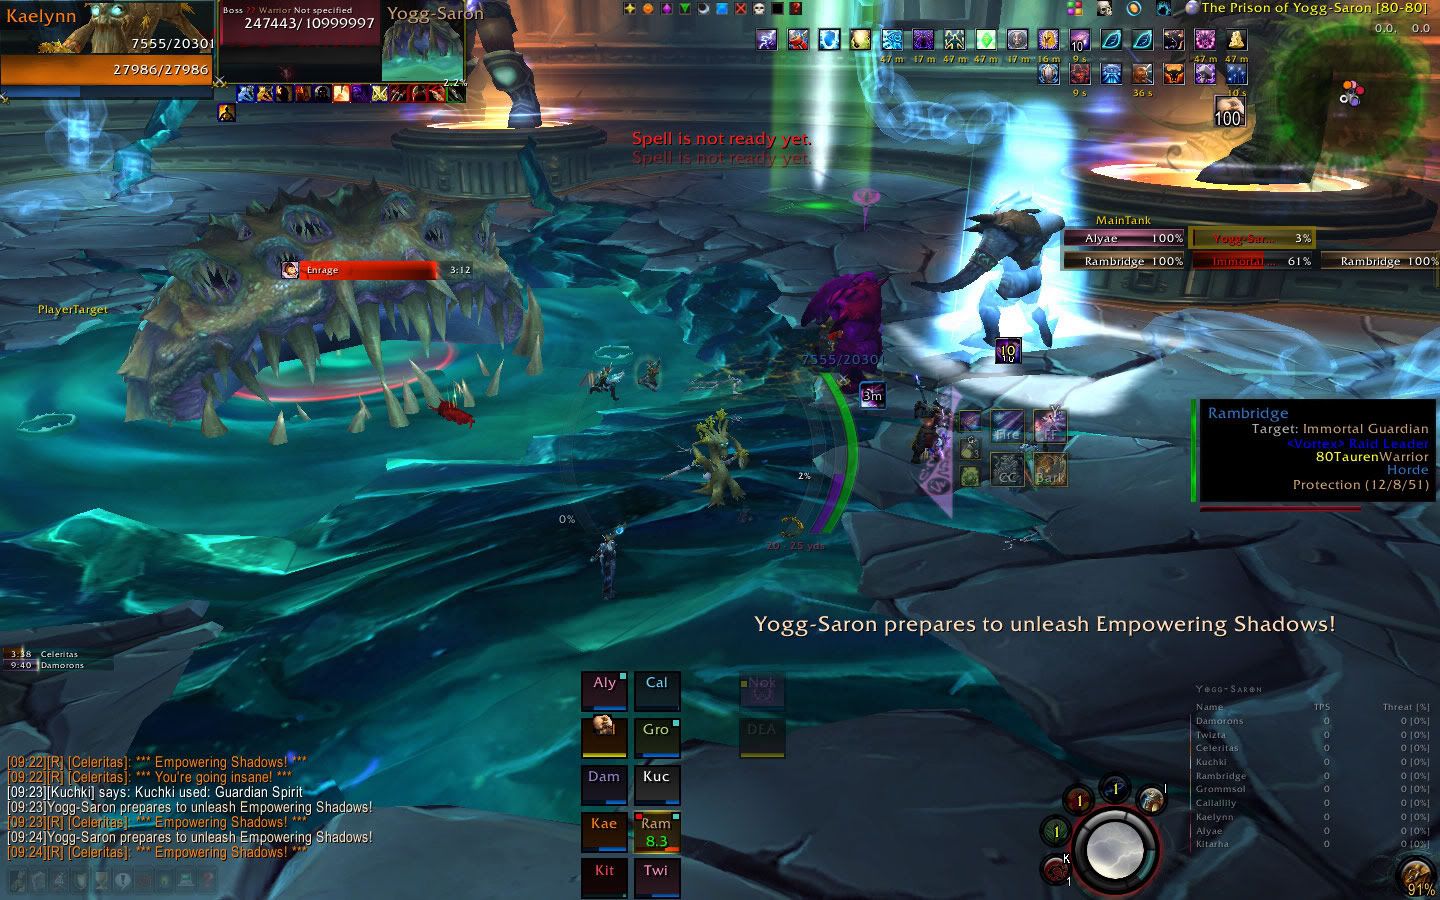
Between expanding my screen size, cutting down on the number of action bars, switching my raid frames, and killing the visible "combat log," I have really cut down on the amount of clutter on my screen while increasing the amount of important buffs/information I can see! At the same time, it feels "smoother" and more comfortable to work in.
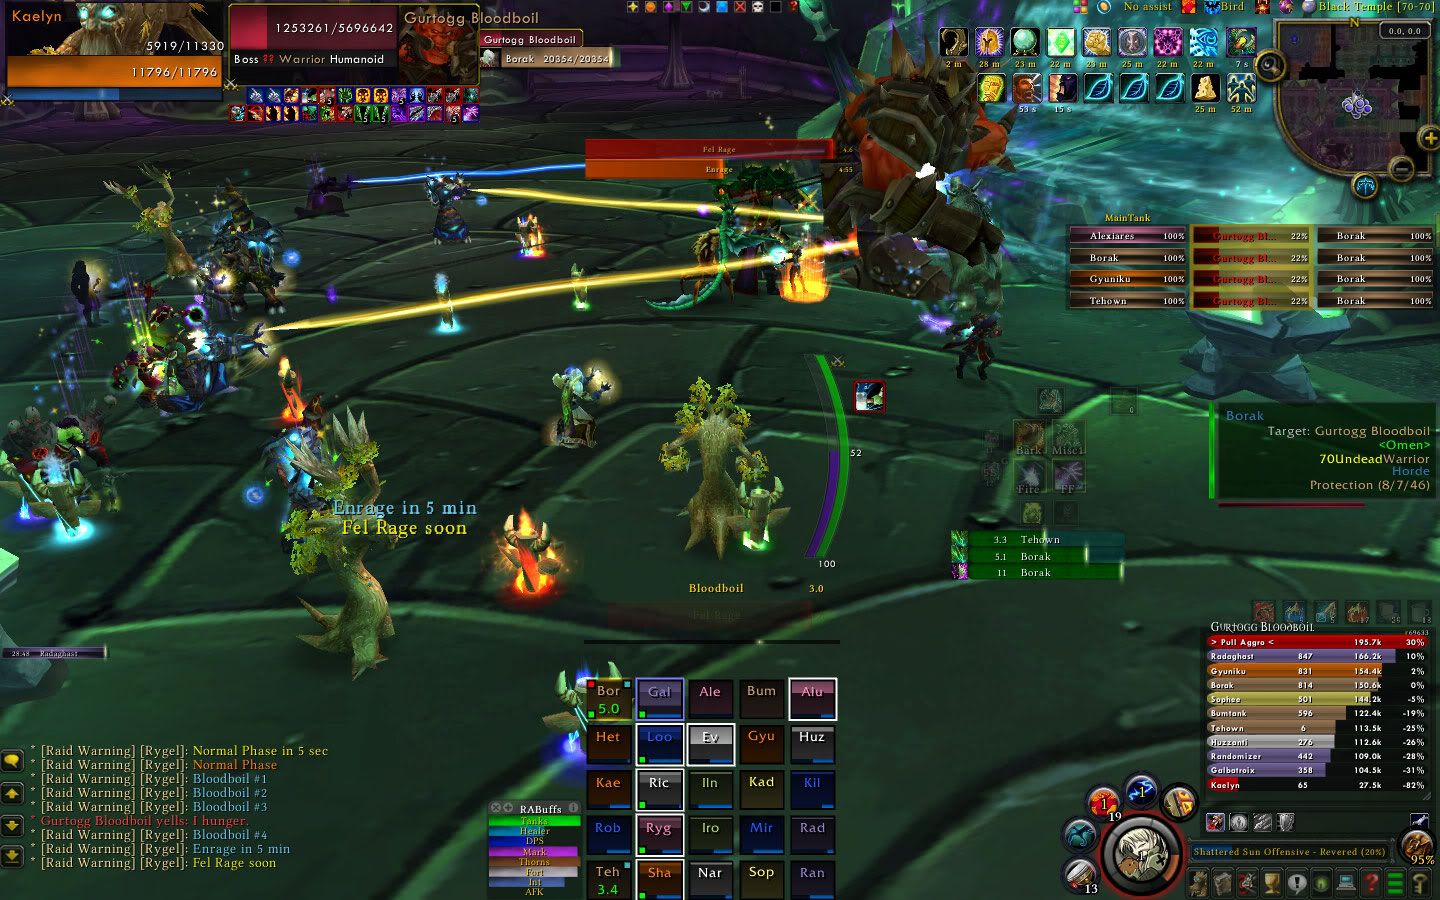


My Methods for Awareness:


- Mods -

  • Grid raidframes to reduce bar size and clutter
...and put them on the bottom of my screen under my character, with enough room for my own cast bar/latency timer (and eclipse proc timer). I like them to be small, squarish frames so that they are as space-saving as possible, and each of the icons and corners and even the frame's border tells me something about what's going on in the raid that I need to know about. Intro to Grid can be found here, and links to my settings and recommendations on debuffs to add.


  • Use a HuD addon
...to quickly glance at my own health/energy and target's health (as compared to some players who stick the entire target frame in or near their center screen). I use IceHUD and it also includes a GCD timer for myself, a redundancy with Quartz but I find the GCD timer easier to watch than Quartz's. I include the range finder for my target, which will tell me in yards how far away my target is from me.

You can turn off any modules you do not want to use, and depending on the HUD, you can add extra timer bars of buffs you want to watch. A Combo Points counter comes standard, as well as a Lacerate Stack counter!

I chose to be able to click through my HUD bars so that they do not interfere with target selection.


  • Debuff Filter and Power Auras
I use these mods to pick out the important buffs/debuffs on both myself, focus target, and my target, and place near center-screen. The most important alerts go to Power Auras; lesser ones or trinket stacks are simply made to be icons that show their countdown/stack. Even tanks can use these mods to watch debuffs that occur on each other if they make the other tank a focus target. More details on my Power Auras setup can be found here.


  • Sexymap reduces Icon Clutter
As a minimap mod, it's not only pretty, but it also can hide all of your addon widgets/icons and time/mail/BG icons from around it, and only show them when you mouseover the minimap. It really rocks. This is one good way to cut down on the visual clutter around your screen!

The skins are all customizable, with gentle animations.


  • Rely on DBM and raid warnings
These will alert me to fire walls, etc. Place the warnings in a very noticeable place on your screen, one that you will not miss from combat text clutter. DeadlyBossMods' (DBM's) timers are great as you can have them scrolling along off to the side, then move to a more noticeable location when they come close to ending/going off!!

  • Cut the spam
...from scrolling combat texts by filtering the size of ticks and choosing not to show things like energy gains and replenishment ticks, or small DoT ticks such as would appear from "Vampire Spam" on a shadow priest. These things aren't really necessary to see, and removing them will reduce interface clutter.


- Screen -

  • Widescreen monitor
Not everyone can afford one, but these are becoming much more the norm than before. Having a widescreen monitor definitely increases your screen real-estate, and widens how far you can see peripherally.

When adapting your UI to a widescreen monitor, however, remember that the peripheral sides are just that: peripheral. Don't stick things that you need to watch constantly off to the sides of your screen. My corners and sides are the place for: tooltips, minimap, bags, chat, threat meter, and personal health (I have IceHUD too!). All of my click-actions and Grid are clustered closer to the middle of the widescreen so that I can have them near to my own character.


  • Removed the majority of my action bars
Since my actions are mostly keybound, I don't need them on my screen to click. I shaped/scaled the few action bars I did need using Bartender4 so they’d be closer to the center screen, or else hid them in menus that open/close on a click (bags/professions using LunarSphere).

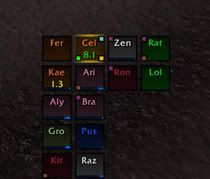
To the left you can see my LunarSphere with all three submenus open. The actions within the menus are used rarely or out of combat, or are keybound for use in combat.


  • Keybound abilities
Removes the need to click around the screen with my mouse. This means that my eyes are free to look at the health bars AND what's going on around me, without having to look over to locate an action I need to click. Full details on my keybinds can be found here.

  • Turn on enemy nameplates
Do this by pressing the v key. I do this so I can easily see by the big red bars what baddies are close to me; these bars are much more noticeable against the movement of players and mobs than just looking for the mobs themselves, and trying to judge their distance by eye. I *do* turn this off when there are tons of them and they prove distracting (such as a swarm of little bugs, etc). Mods such as Aloft can skin and customize these nameplates.

  • Zoom out
...so that I can easily see the ground my character is standing on. It's important to know if there's a fire under your feet, or a void zone, or some evil seal of death, or the targeting crosshairs of some airborne rocket! Or a giant wall of lava coming for me.

  • Position myself!
Face my camera a direction where I can most easily see a wall coming at me, or position myself where I can most quickly just press the w key to move out of a shadow crash without running into the melee or out of range of healing the tank, etc. Don't paint yourself into a corner; mind where you are, and know the quickest exit route to a safe spot.


- Strats -

  • Know the Bosses
If it’s Yogg, those clouds in P1 are more important than nearly anything else, cuz I don’t like trying to clean up around the extra shadow volleys an add would create if I clipped a cloud :) If it's Ignis, I know that the add tank is going to pick up mobs and run them all over the room, possibly out of my heal range. If it's Hodir, I know I should find myself a campfire and/or beam of light for DPS. If I'm melee on XT-002, I know I need to kill that heart asap if we want to do hardmode. Look up the bosses, or ask the raid leader for what details you need to know to perform your best as healer, tank, ranged or melee dps. Know what sorts of AoE are going to happen, and how to avoid them if possible.

  • MOVE AROUND
I do this by running in circles, jumping, etc, and it forces me to keep my surroundings in mind. I’ll stop moving when casting or the environment (lava, adds that might get pulled, etc) forces me to, but very often, I’m bouncing all over the room. Sometimes this translates to me jumping up in melee and punching the mob around spellcasts (and having to move to stay in melee range, avoid cleaves/whirlwinds, and not parry-gib the tank by punching from the front!). Side benefit of this increased awareness is noting the positions of other players, which helps in casting Wild Growth.

  • Practice!
If worse comes to worse, drop yourself into Alterac Valley as a healer to break that pesky tunnel vision/gridlock. Keep yourself behind the front lines, and keep an eye on the ever-shifting front lines so that you can keep up with them and not find yourself suddenly dead to a wave of enemies breaking through. Use your surroundings to hide yourself from view. It's great practice!

Inside of raids, you can have the raid leader pretend to be the "boss" before a pull, and have the raid arrange themselves where they need to stand. Practice calling out "flame waves" or similar environmental occurances so that you can get a feel for what you need to do before you're actually in combat, and where you'll need to stand. If the raid really isn't getting it, you can have an attempt where no one is allowed to DPS, everyone simply must practice the movements of getting out of Blizzards or void zones or fire or lightening blasts!

Tuesday, June 23, 2009

Vacations and Raids

As a head's up, I have a large out-of-game project and a vacation coming up in the next month, so my posting may become a bit more sporadic than it has been otherwise :)
  • First up is a weeklong vacation, visiting a friend out of state, one that oddly enough my husband and I met through this wonderfully social game, though said friend no longer has time to play anymore. My husband and I haven't been on a vacation since early January, and it will be some much-needed time out of town. Kit's especially looking forward to doing some martial arts training at our friend's dojo, and even I have agreed to participate.

  • Second is a camp I'm co-directing. Yep, I am a volunteer camp counselor, and really looking forward to this nearly week-long resident camp. As things are really coming together in recent weeks, I've been kept busy with making sure the finer details of some of the program and available equipment are sorted out, and making sure all the other staff (and myself) are ready for this! Not to mention a lot of support and idea-bouncing with the camp's main program developer as we work out final details. I'm really looking forward to the camp!


The obvious downside (gamewise) to this upcoming travel is that I will be missing 5 total raids, when I've had 100% attendance the past few months and am one of only two fulltime healers in the guild. In a 10-man raiding guild, this is a big blow to the raiding roster, and we've been scrambling to find another healer who can fill in for me, which is interesting to say the least when it comes to Ulduar hardmodes. At the same time, we have other raiders who are experiencing similar vacations, seasonal jobs, etc (we are currently recruiting, fyi, if you're interested in pure ten-man raiding).


Raids and Seasonal Changes

The change of the season is always a bump for guilds; some take it smoother than others, and how smoothly one guild takes it will vary from season to season, and year to year. Nearly every player has lifestyle changes or vacations, and the busiest times of change occur in:
  • Spring -> Summer (schools let out, summer jobs, family vacations, moving to college, summer sports, etc)
  • Summer -> Fall (school starts, summer jobs often push into weekends/evenings instead, general personal schedule changes for sports)
  • New Year (winter vacations, new games released over holidays, temporary winter jobs, change of college class schedules and even winter graduations)
Since it is a game, guild officers and leadership can't really fault their players for these changes. Some players have less control over their lives (gradeschool), and almost all players will have job changes or family changes, or have to travel between college and their hometown or internships. Many players have activities dependent on the season, such as sports, or other activities that must be rescheduled each season for room reservations or instructor availability. Sometimes a player may feel during these seasonal changes that it's even time for them to cut back on their WoW play so that they can focus more on other aspects of their life; other times a player who was but a "casual" member of the guild may suddenly have far more freetime available to commit to raiding than before.

The players themselves must understand that if their own schedule changes lead to them falling below an attendance or reliability level their guild needs, they may no longer find themselves on the raiding roster. Guilds all have different policies for this. As a kindness to your raid leaders, let them know in advance if you're going to have a major schedule change, and if it is temporary or "permanent" (as permanent as anything in a schedule is!). If you weren't previously raiding with the guild but now have the time to commit to it, bring it up with your guild's leaders/officers! They aren't psychic :)

Such changes in the roster can also cause a stir of drama, at times. Some guilds can collapse under the weight, or struggle through and find themselves wholly changed; others ride it out with a few roster changes and think little of it. How your guild handles such change depends on the core raiders and how well they understand that such seasonal changes are a natural part of raiding guilds, how successful applications for any new spots may go, and how dramatic any losses may've been. I've seen some pretty dramatic stuff, too!

If you love your guild and want to help it ride out the seasonal changes, do your best to keep the raid adaptable and positive. Assist with recruitment for the needed spots; offer suggestions of friends or "good pugs" who can help fill holes on a raid night. Run PuGs on your main (rather than an undergeared alt) to find such good players who you can refer to apply, or at least try out during your guild raids when you need a spot filled. Most importantly, stay positive, but realistic, and always realize that change is natural and vacations are a necessary thing!

Sunday, June 21, 2009

Torch Juggler

IMPORTANT: The juggling torches are not soulbound.

You can throw them over to a friend, and you can put them in your guild bank. This makes it quite easy to share your torches after getting the Torch Juggler achievement.

Have a group of 4-5 people complete the torch-juggling practice quest at one of your faction city bonfires, so that all are allowed to catch the juggling torches. This will reward each of you 5 torches. Each of you should keybind your torches to make them easy to spam, then, gathering in Dalaran, throw all of your torches over to one person by tossing the torches to them, targeting them with the green "aoe" type targeting marker. It is important that the target-player not move, or else the torch(es) may be lost. Edit: alternatively, you can just trade them to that player... ... ... hush, I like throwing things!! To quote the little fire elementals in Nagrand, "Reth reth reth!!"

Once one player has all of the group's torches, they should spam the torches at their own feet (targeting themselves, basically). Just keep spamming the button, and the torches will be juggled. Eventually, with enough spamming, they will get the 40-torches-in-15-seconds achievement, and they can then throw all of the torches over to the next person.

Once each person in your group has the achievement, you can put them in your guild bank for someone else to use, or toss them off to someone else. The new recipient MUST have completed the first torch-juggling quest in order to be able to catch them, however!

Mind your leaves :) You can toss torches while in cheetah form, though, so you may find travel form useful while trying to chase the dailies' torches around the screen!

Friday, June 19, 2009

Patch End of the World

I do get a small giggle out of all of the "Sky is Falling!" posts, comments, and complaints. It happens on every patch, to greater or lesser degrees; if anyone or anything is being decreased at all, *someone* will complain. Often, if something is increased, *someone else* will complain, too!

I don't spend time on the PTR, and by the time it's gone through the first few rounds of PTR changes, things will have again changed or been polished to a degree. Once things get down to the final countdown for live release, then I'll really look into what the changes mean and how I--and my friends and raid--will have to adapt to them.

Just because something is going on the PTR doesn't mean it's going to be in the live game.

It's a test realm. Thousands of players will be checking it out, and developers will be looking over the results to see what worked and what didn't. Blizzard isn't out to destroy a class; if they really wanted to destroy a class, they'd remove it from the game. Yes, they may make mistakes, but they have smaller patches and hotfixes for that. In the end, it shakes loose those players who were in the class as a "flavor of the season," and those still with the class will adapt to the changes and move on. If you truly love playing the class, you will find a way to make it work.

We saw it with the addition of (omg ugly and slow and no HT rank 4's!) tree form, we saw it with the nerfs to lifebloom and regrowth glyph, we saw it with the destruction of using down-ranked spells, and we saw it with the holy pallies' previous mana regen nerfs, just to name a few examples.

This early in PTR development, nothing is final. If you're fretting over changes, the best thing you can do is to think hard on how you'd adapt to such changes, then get on the PTR and really test things out. See what works and what doesn't, then accurately summarize on a forum/blog post how the changes affected your playing style, what things you did to accommodate for the changes, and if you were still able to perform your role in the situations you tested. Such a description will go over far better than an untested, aggressive rant.


That said, here is a run-down of my comments on the current PTR patchnotes.

- Argent Tournament:
While many may've held off on turning in the final quest to become Champion of their last race-faction in order to keep the dailies available, it will now be time to finally turn it in and get that Crusader title, as doing so will now make a whole new set of dailies and quests available. I am looking forward to the hearthing tabard and the addition of yet another pet!

- Zepplin Org - TB:
This seems to be the horde version of the boat from Auberdine to Stormwind, allowing lowbies to quickly cross the world to reach the most popular city of their faction.

- Stair of Destiny Portals:
It will be very nice having a quick port from Stormwind/Org to the Blasted Lands, particularly for those players ~58. I wish this had been added back when Karazhan was a popular raid, but ah well :)

- Mailboxes:
Let there be moar.

- Dalaran Children's Week:
A bit late, but I suppose better for that it gave us all time to get all of those PvP achievements for the previous Childrens' Week out of the way.

- PvP:
While the Commander/Justicar Kae within me chides me for this, I'm honestly not that interested in the PvP changes. I did listen to that former PvPer in me, though, and at least gazed down the battlegrounds changes. Things of interest include the support of "Twinks" by being able to turn off experience gains (they are a significant enough chunk of the player base, apparently), the lowering of battleground durations to 1600 points/resources or 20 minutes for WSG, and the reduction of the amount of time it took to cap a resource node or pick up the EotS flag.

- Orc Racial:
Enhancement Orc Shammies rejoice, fist weapons are now included.

- Emblems:
Emblems of Conquest for EVERYONE! Tis like a gumball machine. Heroic 5-man? CONQUEST! Naxx 10? Conquest!! Want something from valor/heroism vendor? Just convert em! I'm just waiting for the time to come that they combine the vendors into one all using Conquest badges, like some crazy reverse NPC mitosis.

- Mounts:
Covered by other bloggers in most cases, so I will be brief on this. Yay for faster, younger scraggedy crow-form, and yay for level 16 cheetahs. Zoom Zoom. For those in Northrend, you will be interested in the removal of the "no flight" zones over Dalaran and Wintergrasp, provided you stay "a healthy distance above the ground" while flying.

- Mana Regen:
Mp5 on items increased by 25% in power. Poor spirit.

- Replenishment:
Small nerf on the amount of mana it returns, though it will also be less spammy for those that have replenishment gains showing up in their combat text.

- Chef's Hat:
Increases cooking speed!

- Blackened Dragonfin:
Now only takes 1 fish per, rather than 2. The melee will rejoice.

- Waterlogged Recipe:
New reward chance from fishing daily in Dalaran, earns "several" Dalaran cooking awards when turned in. Tradeable.

- Raptor Hatchling Pets:
Baby raptor pets drop off of rare and elite raptors around the game now; one can also be purchased from Brianni in Dalaran.


- Druids -
- Innervate:
Got cut in half. You can have half now, and half in 3 minutes. This means you only restore 7,866 mana per innervate at level 80, so you won't want to wait until you're almost OoM before using it, like we did before.

- Lifebloom:
Bloom nerfed again. Syll said it best, I think, with "But it seems that in Blizzard’s juggling act, most of our spells are hackey sacks and Lifebloom is a flaming bowling ball." 20% of the bloom has been reduced by 20% on the base and on the spell power coefficient." Pity, I was just adapting to using the bloom as a heal! But, as it is usually all overheal anyway (except when I use it on Vezax ><) this probably won't be a big deal to PvE raiding druids.

- Feral:
Had a nerf coming. I was out-DPSing better geared players on my feral druid, and my guildie feral was indeed a beast on DPS. This is not to say I haven't seen terribad ferals as well; feral does take some skill to play well, as they juggle all of the DoTs, buff, and the positionally-dependant Shred. I just hope that through PTR testing, the nerf results in them being brought into line, rather than drug through the dirt with a muzzle and declawed.

- Balance of Power:
Reduction to spell damage taken, as opposed to reduction to chance to be hit by spells. I'm not sure how this will affect the turkeys as far as spell damage they take in a PvE raid, but I imagine it'll be nice as a small damage reduction in the boss AoE.

- Eclipse:
Wrath and Starfire have been split to separate cooldown timers, and cannot be active at the same time. So, conceivably, you can pew pew with one buff up, then get a crit on the last buffed spellcast and proc the other one. It should result in more time spent with one eclipse or the other procced, as you would want to get a proc off of one while the other is on CD. In a way, this may make Moonkin spell use even more confusing to learn, but overall increase the DPS done.

- Empowered Touch:
A straight buff to Nourish. I already specced for this talent, since I use NS+HT quite a lot in my ten-mans, so I am looking forward to having this talent provide a buff to my nourish as well.

- Imp Barkskin:
The patch change is again a PvP change, making the dispel-reduction only work for the Barkskin buff itself. This doesn't change anything for PvE.

- Glyph of the Claw
For the baby ferals.

- Other Classes' changes of Druid interest -

- Hunter Traps:
Each type is now on a separate cooldown, rather than shared. This means they can ice-trap that aggroed mob on you even if they just laid down an explosive trap.

- Rogues + Axes:
Rogues rolling on axes. WTF. Like we trees really needed more axes being swung around the raid. Seriously? ;)

- Shammies:
Chain heal got buffed, and they can now put 4 totems down all at once, rather than in separate GCDs. Their NS is now also at a 2-minute cooldown, rather than 3min: be jealous!

- Warlocks:
Banish can now be canceled on a target by recasting banish at it. No more waiting for the banish to wear off!

Wednesday, June 17, 2009

GridStatusSanity

Yogg Saron. Raid-wide Sanity monitor. Need I say more? Download here!

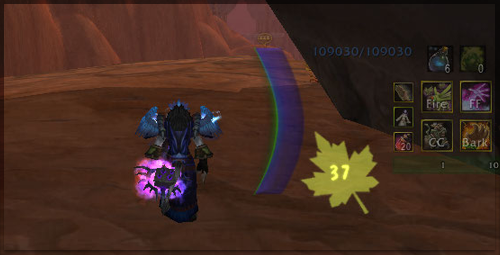
I was quite happy when I found this Grid addon. What it does is pop up a sanity alert icon on the raid frame when that player drops below 50 sanity (or you can edit it in the Status menu to be a different threshold), at which point you can remind that player to get their tail over to one of Freya's sanity wells before they go all "Do you read Sutter Cane?" on the raid!
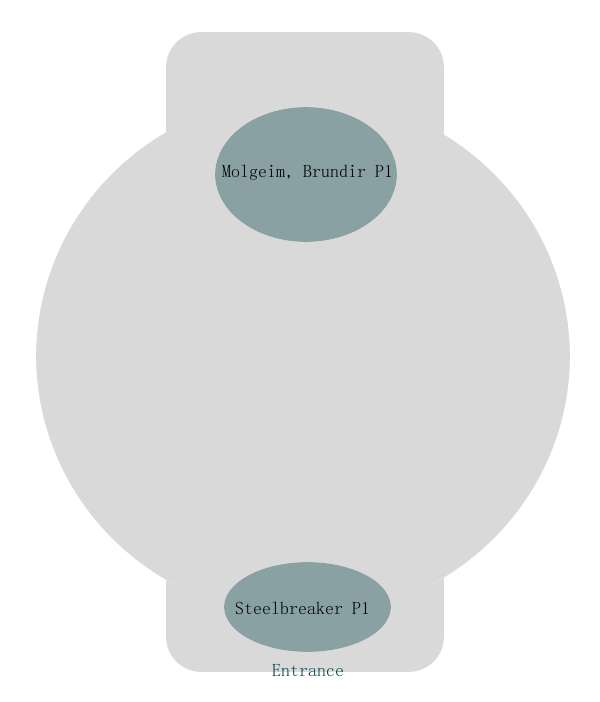
Setup:
I tested it out this past weekend; the only setup it requires is that you decide a location on your Frames to have this alert pop up. Grid -> Frames -> (choose location and put a checkmark next to "Sanity" for that location). If you want a different threshold than the default, just alter it in the Grid -> Status -> Sanity settings.

I recommend putting it in a different frame location than your other Yogg Debuffs, such as Squeeze and curses/poison/magic/disease, so that it isn't hidden beneath those other statuses or otherwise conflict with them. For additional icon places for your frames, you can download CornerIcons or SideIcons.

Tuesday, June 16, 2009

Raiding Food (the real stuff!)!


Raids can span over several hours or more, and snacks--even meals--are consumed during them. I do make an effort to keep generally healthy snacks in the house, but convenience and ease of eating the food are what makes a true "raid snack!"

Healthy Stuff

Baby Carrots
- These are a favorite of a few of those that I raid with (most notably the GM of vortex! Crazy carrot lady!). They can be purchased ready to eat, often in a resealable bag, and are just as good chilled as they are at room temperature after being left sitting on your desk for hours.

Bagels
- Plain bagels don't tend to result in too many crumbs, and you can spread it with some cream cheese if you have time or the inclination.

Soft Pretzels
- These can be found in the freezer section of some groceries, and can be quickly nuked up for a warm pretzel. Bit of mustard goes well, but like most condiments, too much will make things messy and could also negate the whole health thing ;)

Apples/Pears/Seedless Grapes/Berries/Bananas
- These fruits aren't as juicy/messy as many others, and can be munched without too much trouble. Cherries may work well too if you can deal with the pits. You can pre-slice the larger fruits if you want.

Dried Fruits and nuts
- Dried cranberries, raisins, banana chips, dried apples, apricots, mango, pineapple, etc. I especially love dried mango, though it can be very expensive per ounce! Some dried fruits and nuts may come with coatings of sugar or salts (or other flavors) that will require a napkin.

Popcorn
- Reduce the amount of butter/salt/flavorings to reduce the amount of finger residue. This will need to be prepared during a break, however, since you'll need to monitor your popcorn as it cooks to keep it from burning.

Granola Bars
- Go druid. Of course, those drenched in chocolate and sugars will be less healthy than those not!

Fruit Snacks
- though my jaw dropped when my preferred kind, Welch's, was relocated to the candy isle, while the stuff like Gushers were left next to the granola. I don't get it. >.> FYI, the "Florida's Natural" brand fruit snacks are rated highest for nutrition on that website.

Crackers
- Some may not be healthy, of course, but most brands of crackers are better than most brands of potato chips, I would think :D Some, like Cheez-Its, may still require a napkin to clean hands.

Cheese
- String Cheese, or even just a brick of cheese with a knife. Take the opportunity to try out new kinds of cheeses from your grocery store... harvarti's my current favorite. Just watch the saturated fat, cholesterol, and sodium contents, as this can vary between cheeses and brands.

Soup
- in a cup. Mugs work well. You won't want a very chunky soup with large pieces in it, though, unless you have time for utensils! I love canned tomato soup, though you can also mix up your own soup using canned veggies (with the liquid), broth, and small chunks of meat if you prefer.


Drinks

Smoothies
- If you have a blender, mixing up a smoothie before raid-time is a great alternative to soda, and a way to consume those messy fruits that you may otherwise skip. You can find lots of recipes online.

Juice
- A better alternative to soda. It can be cheaper to get these as frozen concentrates. Try to choose juices with as high a juice percent as you can; the rest in those "juice cocktails" is just sugar/sweetener (corn syrup) and water.

Tea
- You can stock up on multiple varieties of tea bags. One of my favorites is White Pear. Many teas can be chilled as well, though would need advance preparation to allow cooling time.


Junk Foods


Nachos
- I like to take Tostitos (restaurant-style tortilla chips) and layer them on a plate with shredded cheddar cheese, then nuke it for 30-45 seconds to make it gooey. You can usually avoid getting the cheese on your fingers, but the salt makes napkins necessary. Adding salsa/sour creme will make it much messier, however. Depending on your chips and cheese (and any other toppings), this may be more healthy than most other junk foods.

Potato Chips
- Avoid the cheese-dusted ones unless you don't mind getting your mouse/keyboard messy or have a large stash of napkins and time to clean your hands between munches and playing. Baked ones may be better for you, and likely will have less to dirty your fingers with.

Pretzels
- The bagged kind, they're hard and clean enough of a finger food that they're pretty good as a raid munchie. Some may come with flavored coatings, though... I do like the honey mustard kind!

Oreos (or other cookies)
- With milk. Om nom nom. Don't drop a soggy cookie on your keyboard. :3 Do note that it is usually cheaper to buy store-brand cookie dough (or even mixing your own dough) and baking your own warm cookies than it is to buy the pre-packaged varieties.

Snack Cakes
- These can be pretty expensive and usually very unhealthy, but I will admit that many taste really good and they can be so convenient.

Candy
- Gummy Bears, Skittles, M&M's, etc. Lindt Lindor Truffles are excellent, though individually wrapped.


~~ Have suggestions for the list? I'd like to keep it growing!~~

Monday, June 15, 2009

U10: Runecaster Molgeim

Assembly of Iron


The difficulty level for Iron Council (Assembly of Iron) scales depending on which of the three bosses you choose to kill last. The easiest method is to kill Steelbreaker --> Molgeim --> Stormcaller Brundir; the hardest is to save Steelbreaker for last. Middle difficulty is destroying Runecaster last.

The primary reason you would wish to increase the difficulty is that Molgeim (and Steelbreaker) will drop the Archivum Data Disc, a quest item which leads to being able to summon Algalon. While Steelbreaker is the true hardmode and will drop extra loot as well as the Data Disc, Molgeim is a bit easier and will drop the Data Disc along with normal loot.

If you have killed the "easy mode" before, you will remember Molgeim's abilities:
  • Shield of Runes - a damage-absorption shield that can be dispelled/purged/etc.
  • Rune of Power - a blue glowing rune on the floor cast under the feet of one of the bosses, that increases damage done by anyone or any enemy standing in it.
  • Rune of Death - a giant glowing green rune that hurts anyone standing in it.
In addition to these abilities, Molgeim will gain a new one when his two friends have fallen:
  • Rune of Summoning - a relatively small, "prickly" black/purple rune that will summon a bunch of miniature air elementals. Don't underestimate these little guys, however: they pick a target and rush towards them, and when they reach melee range, they "explode" for 9-10k damage to all players within 30 yards.

Raid Makeup:
  • 2x tanks
  • 2x healers
  • Mix of melee and ranged dps, with a good dose of AoE
  • 1-3 dps interrupts
  • Magic Cleanser for Fusion Punch
  • Hunter or Shaman for nature resist, preferable
We used:
  • Prot Pally and Prot Warrior
  • Resto Druid and Holy Priest
  • Marksman Hunter
  • Frostfire Mage
  • Destro Warlock
  • Blood DeathKnight
  • Ret Pally
  • Kitty Druid

Phase 1: Kill Steelbreaker

The Pull:

Have one tank pick up Steelbreaker to tank in the front of the room, while the second tank picks up the other two and tanks them in the back of the room.

Send one or two melee interrupts (one + tank if your tank can interrupt) and one healer with the back tank; the healer for this back tank can position themselves roughly in the center of the room.

One healer, your magic-cleanser, and the rest of your dps should be with Steelbreaker in the front of the room.


Resto Druids: as a master of rolling HoTs, you may be best-equipped to heal the Steelbreaker tank, depending on what sort of magic cleanses are available in the raid. Even so, HoT up the second tank as the group moves in, so that your HoTs can offset the damage received while the other healer is still moving into place.


P1 fight:


DPS will work on killing Steelbreaker, preferably clustering together to aid in AoE healing. The tank will need to kite Steelbreaker out of any runes of power cast on him. DPS should stand in these blue runes of power to increase their own damage. Whenever possible, the tank should carefully position the boss so that the boss is not standing in a rune of power, but the melee dps is!Meanwhile, the second tank will be holding the other two in the far back of the room, where overload will not cause any problems for the rest of the raid. The back healer should stand out of range of the overload blast at all times. The interrupter will work on preventing Stormcaller Brundir from getting off a Chain Lightening, and both the interrupter and the tank will need to run out when Brundir casts overload. These two bosses will also need to be kited out of any runes of power.


Phase 2: Kill Brundir

Phase 2 begins when Steelbreaker dies. At this point, Molgeim is now casting Runes of Death and Brundir is able to cast Lightening Whirl. Steelbreaker's tank will run over and pick up one of the two bosses (we chose for her to pick up Molgeim since the other tank already had plenty of threat to allow dps to begin immediately), while dps will switch to killing Stormcaller Brundir.

The Molgeim tank will just be kiting Molgeim around the room, and will not be taking terribly heavy damage except when Molgeim is in a power rune or the tank is caught in a rune of death. While Molgeim doesn't need to be tanked all the way at the other door, he should be pulled back to that half of the room, so that the Molgeim tank is easily out of range of Overload and is unlikely to be hit by any death runes. Ranged dps and healers should not stand too close to the Molgeim tank to reduce the risk of sharing a death rune with the tank.

The Brundir tank will also continue to kite the boss out of runes of power and/or death, and every player needs to be aware of overload casting.
  • Interruptors will need to trade interrupting the Chain Lightening and Lightening Whirl as much as possible.
  • Ranged players should spread out around the middle and sides of the room to reduce the number of players hit by a rune of death, though dps are encouraged to cluster in runes of power when they are available (though of course not when the power rune is in a death rune!).
  • It is especially important that healers spread apart from each other, to be able to blanket the room with heals and not both be caught running from the same rune of death. They should be able to often reach both tanks without standing together, though the placement of death runes may make the healers stand together sometimes.
  • All players should monitor where Brundir is being kited, so that they do not get caught in the overload. This includes healers and Molgeim's tank!

Resto druids: Wild Growth is very useful to cast on a cluster of melee hit by a bit of lightening, or on a group trying to flee a rune of death. Try to cast it quickly on them before they fully scatter out of range of sharing the wild growth with each other.


Phase 3: Kill Molgeim

Phase 3 begins when Brundir dies. In addition to all of the previous abilities, Molgeim will now be summoning his elemental adds, and this can make things quite chaotic.

Molgeim will need to be kited away from the summoning runes to increase the distance the adds must travel before they reach their targets. The adds CAN be taunted, though taunters must remember that they will explode on everyone nearby (30 yards) for 9-10k damage when they reach you. Healers should also run far away from the summoning runes.

AoE should be laid down upon any summoning runes, and melee/ranged should get as far away from them as they can before beginning to AoE on the circle. Ranged dps should take out the adds that spawn (they will spawn one at a time), and clean up any that escape the aoe. The adds will not explode if they are killed before they reach their target, but they can and will change targets just like any aggro-driven mob! Each summoning circle spawns an add for every player in the raid.
  • The adds can be rooted/snared by frost traps, imp blizzard, and totems. It is unadvisable to use frost nova since that requires coming within melee range of the adds.
  • Melee DPS should remain on the boss.
  • Ranged DPS should prioritize killing the adds.
  • Healers and the tank must always move away from summoning runes!
Adds will need to be dealt with around runes of power and runes of death, as well as the Shield of Runes that Molgeim will cast upon himself. You may choose to have someone dispel or spellsteal this shield from Molgeim, or you can choose to power through the absorption shield (it's 20k damage) and just heal through the +50% damage boost that Molgeim receives when it wears off. Dispelling it/spellstealing it may be preferable, as it will give the mage a damage shield as well as lessen the amount of damage the tank will be taking.

This last phase requires a lot of mobility, and the tank needs to be on their toes about moving Molgeim away from runes of death and runes of summoning. The adds are what will overwhelm a raid here: two consecutive explosions will usually be enough to kill healers and your squishier ranged, and things will spiral out of control from there.

Good luck, and have fun!

Sunday, June 14, 2009

Power Auras: My Settings

Last update: February 5, 2011

These are my settings for power auras, if you're interested in copying :) There are a couple other auras I've been playing with, but these are the ones that I can confirm will work well. I have also added "timers" to many of these, and will edit in those settings when I get a chance! Other, unlisted Power Auras I use include several for my rogue: evasion and cloak of shadows.

NOTE: to import these settings, click on the "Import String" button in your /powa menu, and paste in the text from the import string boxes below.

You may need to fix the placement of your text timers, however.


General:

Druid:


Low Health -


The red brackets in the screenshot are my low health warning; the purple glow (conveniently aligned with my IceHUD mana bar) is my low mana warning.

Import String:
Version:4.9; b:0.0078; anim1:5; g:0.0235; ignoremaj:false; icon:inv_alchemy_elixir_05; r:0.7294; begin:2; groupany:false; unitn:Only for raid/group.; bufftype:8; texture:24; alpha:1; isResting:0; stacksOperator:=; PowerType:0; threshold:30; size:1.54; anim2:4; finish:2


Low Mana -

The purple light highlighting my mana bar on IceHUD when I'm less than 75% mana. Innervate returns 20%, so I want to use it early and often! Move it around or change the graphic as you wish.


Import String:
Version:4.9; anim1:2; g:0; icon:inv_alchemy_elixir_02; r:0.8353; x:102; groupany:false; unitn:Only for raid/group.; bufftype:9; texture:45; alpha:0.5; symetrie:2; isResting:0; stacksOperator:=; PowerType:0; threshold:75; wowtex:true; size:0.76; y:-63; anim2:4; finish:0


5 Combo Points -

A small alert for when I have reached 5 Combo Points.


Import String:
Version:4.9; b:0; anim1:4; g:0.7333; icon:inv_sword_48; buffname:5; begin:1; groupany:false; unitn:Only for raid/group.; bufftype:6; texture:27; isResting:0; stacksOperator:=; PowerType:0; size:0.24; y:106; anim2:5; finish:2


Aggro -

Shows if I have aggro on something! I am looking for a way for aggro to NOT pop up if I am in bear form: if you have an idea on how to do this, please let me know :)


Import String:
Version:4.9; b:0.0118; anim1:4; g:0; icon:Ability_Warrior_EndlessRage; x:188; groupany:false; unitn:Only for raid/group.; bufftype:11; texture:52; isResting:0; stacksOperator:=; PowerType:0; wowtex:true; inParty:true; size:0.52; inRaid:true; y:131; finish:2


Clearcasting buff -

Shows if OoC has procced!

This aura is depricated as the game has a built-in alert for it, but if you like this version, it is still available for import here.


Import String:
Version:4.9; anim1:4; g:0.8353; icon:Spell_Shadow_ManaBurn; buffname:Clearcasting; r:0.0471; groupany:false; unitn:Only for raid/group.; texture:2; alpha:0.55; isResting:0; stacksOperator:=; PowerType:0; size:1.5; y:-8; timer.h:1.39; timer.enabled:true; timer.y:-141; timer.x:-141


Nature's Grace buff -

A great way to easily see if Nature's Grace has procced, and thus you have a faster GCD/spellcasting.


Import String:
Version:4.9; b:0.2667; anim1:4; icon:Spell_Nature_NaturesBlessing; buffname:Nature's Grace; r:0.7608; x:170; groupany:false; unitn:Only for raid/group.; texture:23; alpha:0.45; symetrie:1; isResting:0; stacksOperator:=; PowerType:0; wowtex:true; size:0.47; torsion:1.05; y:-57; finish:0; timer.h:1.3; timer.enabled:true; timer.cents:false; timer.Relative:CENTER


Eclipse buff -

The following TWO auras are in the same place and have the same graphic, but the "you want to cast wrath now" proc is an orange color, and the "you want to cast starfire now" proc is a violet blue color. I like it as a brighter way of noting whether or not eclipse is active on me, against the eclipse internal cooldown bar from SquawknAwe.

NOTE: Many thanks to Starleaf Seed on how to make separate procs.


Import String for Starfire:
Version:4.9; b:0.1137; g:0.6078; buffname:[48517]; groupany:false; unitn:Only for raid/group.; texture:16; alpha:1; symetrie:2; isResting:0; stacksOperator:=; PowerType:0; size:0.98; torsion:1.05; y:-54; anim2:2; timer.h:1.39; timer.enabled:true; timer.cents:false; timer.y:-160; timer.x:4


Import String for Wrath:
Version:4.9; g:0.2471; buffname:[48518]; r:0.5373; groupany:false; unitn:Only for raid/group.; texture:16; alpha:1; symetrie:2; isResting:0; stacksOperator:=; PowerType:0; size:0.98; torsion:1.05; y:-54; anim2:2; timer.h:1.39; timer.enabled:true; timer.cents:false; timer.y:-160; timer.x:5; timer.Transparent:true


Faerie Fire debuff -

This will show Faerie Fire on my target, be it feral or "caster" version, cast by any druid.


Import String:
Version:4.9; b:0.8431; g:0.4863; target:true; icon:Spell_Nature_FaerieFire; buffname:Faerie; begin:2; x:209; groupany:false; unitn:Only for raid/group.; bufftype:2; texture:15; alpha:0.4; symetrie:2; isResting:0; stacksOperator:=; PowerType:0; wowtex:true; size:0.42; torsion:0.5; y:-2


Barkskin -

A Barkskin-is-active alert for myself, with a timer until it wears off.


Import String:
Version:4.9; b:0; g:0.5608; icon:Spell_Nature_StoneClawTotem; buffname:Barkskin; x:-341; groupany:false; unitn:Only for raid/group.; texture:28; isResting:0; stacksOperator:=; PowerType:0; size:0.76; torsion:1.2; y:-2; anim2:2; timer.h:1.38; timer.enabled:true; timer.cents:false; timer.x:-337


Survival Instincts -

A Survival Instincts-is-active alert for myself, with a timer until it wears off.


Import String:
Version:4.9; g:0; icon:Ability_Druid_TigersRoar; buffname:Survival Instincts; r:0.8627; groupany:false; unitn:Only for raid/group.; texture:4; alpha:1; isResting:0; stacksOperator:=; PowerType:0; size:2; y:-4; timer.h:1.31; timer.Texture:Original; timer.enabled:true; timer.cents:false; timer.y:-143; timer.x:-183


Berserk -

A Berserk-is-active alert for myself, with a timer until it wears off. This will *not* light up Berserking procs off of a weapon, if you run with that enchant: I have updated the aura to use the spell ID rather than the buff name.

If you'd like to have a seperate buff timer for your berserking enchant proc, use the spell ID [59620].


Import String:
Version:4.9; b:0.0039; anim1:4; g:0; icon:Ability_Druid_Berserk; buffname:[50334]; begin:2; x:-294; groupany:false; unitn:Only for raid/group.; texture:48; symetrie:3; isResting:0; stacksOperator:=; PowerType:0; wowtex:true; size:1.24; y:32; timer.h:1.85; timer.Texture:Original; timer.enabled:true; timer.cents:false; timer.y:-74; timer.x:-256


Mangle/Trauma -

An alert that tells me if mangle or trauma is up on my current target. This is useful for those times that you are running with someone else who will be your Mangle-Bot, as a way to monitor that the buff you want is actually present. It uses the spell ID for Trauma to ensure that the shadow priest Mind Trauma debuff will not give you a false positive on this aura.


Import String:
Version:4.9; b:0; g:0.2824; target:true; icon:Ability_Druid_Mangle2; buffname:Mangle/[46857]; x:297; groupany:false; unitn:Only for raid/group.; bufftype:2; texture:23; isResting:0; stacksOperator:=; PowerType:0; size:0.86; torsion:1.5; y:-67; timer.b:0; timer.g:0.0275; timer.h:1.85; timer.enabled:true; timer.cents:false; timer.y:-98; timer.x:298; timer.UseOwnColor:true


Swiftmend Cooldown
-

A cooldown timer for Swiftmend: it tells me I can't use it until it goes away.


Version:4.9; b:0.5647; g:0.5412; icon:INV_Relics_IdolofRejuvenation; buffname:Swiftmend; r:0.2627; x:-222; bufftype:15; texture:25; alpha:0.1; isResting:0; mine:true; PowerType:0; spec2:false; size:0.23; torsion:1.5; y:-274; inverse:true; ismounted:0; customsound:soft_chime_beep.wav; anim2:1; finish:0; timer.HideLeadingZeros:true; timer.h:1.11; timer.enabled:true; timer.cents:false; timer.y:-261; timer.x:-199


Nature's Swiftness Cooldown
-

A cooldown timer for Nature's Swiftness: it tells me I can't use it until it goes away.


Version:4.9; b:0.0314; g:0.102; icon:Spell_Nature_RavenForm; buffname:Nature's Swiftness; r:0.5647; x:-222; bufftype:15; texture:120; alpha:0.1; isResting:0; mine:true; PowerType:0; spec2:false; size:0.23; torsion:1.3; y:-312; inverse:true; ismounted:0; customsound:soft_chime_beep.wav; anim2:1; finish:0; timer.HideLeadingZeros:true; timer.h:1.11; timer.enabled:true; timer.y:-300; timer.x:-200


Tree Form Cooldown
-

A cooldown timer for Tree Form: it tells me I can't use it until it goes away.


Version:4.9; b:0.1216; g:0.5294; icon:Ability_Druid_TreeofLife; buffname:Tree of Life; r:0; x:-262; bufftype:15; texture:146; alpha:0.1; isResting:0; mine:true; PowerType:0; spec2:false; size:0.86; torsion:1.35; y:-306; inverse:true; ismounted:0; customsound:soft_chime_beep.wav; anim2:1; finish:0; timer.HideLeadingZeros:true; timer.h:1.11; timer.enabled:true; timer.y:-341; timer.x:-199


Bloodlust buff
-


Import String:
Version:4.9; b:0; anim1:2; g:0.1098; icon:Spell_Nature_BloodLust; buffname:Bloodlust; r:0.9176; x:-3; groupany:false; unitn:Only for raid/group.; texture:33; isResting:0; mine:true; stacksOperator:=; PowerType:0; size:1.41; y:33; anim2:6; timer.h:1.39; timer.enabled:true; timer.cents:false; timer.Relative:TOP; timer.y:-82


Raid Debuffs 1 -

Unbound plague, Necrotic plague, Frenzied bloodthirst, Soul Consumption, and Fiery Combustion for ICC and RS. Includes a duration timer.


Import String:
Version:4.9; anim1:4; g:0.0784; icon:Spell_Shadow_SoulLeech_3; buffname:Unbound Plague/Necrotic Plague/Frenzied Bloodthirst/Soul Consumption/Fiery Combustion; r:0.9882; bufftype:2; PowerType:0; anim2:5; timer.h:1.44; timer.enabled:true; timer.cents:false; timer.y:49; timer.x:1


A version for use with Mystic Buffet for Sindragosa/Waterlogged for BoT includes a duration timer:

Version:4.9; anim1:4; g:0.0784; icon:INV_Elemental_Primal_Water; buffname:Mystic Buffet/Waterlogged; r:0.9882; bufftype:2; stacks:4; PowerType:0; y:109; anim2:5; timer.h:1.85; timer.enabled:true; timer.cents:false; timer.y:44; timer.x:2; stacks.enabled:true; stacks.r:0.4039; stacks.g:0; stacks.y:185; stacks.UseOwnColor:true; stacks.h:1.85


Wind Blast spell alert -

Target spell-warning for Wind Blast for T4W.


Import String:
Version:4.9; target:true; buffname:Wind Blast; bufftype:13; texture:10; exact:true; y:147


Raid Debuffs 2 -

Mark of the Faceless, Instability, Gaseous Bloat, and Shadow Trap for Uld, ICC, and RS.
Parasitic Infection, Engulfing Magic, Lightening Rod, Fixate for BWD/BoT.
Includes a duration timer.


Import String:
Version:4.9; anim1:4; icon:Ability_Creature_Poison_05; buffname:Mark of the Faceless/Instability/Gaseous Bloat/Shadow Trap/Engulfing Magic/Parasitic Infection/Lightening Rod/Fixate; bufftype:2; texture:10; PowerType:0; y:161; anim2:5; timer.g:0.7608; timer.h:1.85; timer.enabled:true; timer.r:0.949; timer.cents:false; timer.y:226; timer.UseOwnColor:true; stacks.enabled:true; stacks.y:106; stacks.h:1.85


Aspect Cheetah/Pack -

This is a warning if you are in combat with a hunter's aspect of the pack or cheetah active on you (which could subsequently get you dazed).


Import String:
Version:4.9; b:0.1608; g:0.0745; icon:Ability_Mount_JungleTiger; buffname:Aspect of the Pack/Aspect of the Cheetah; begin:3; x:27; texture:29; PowerType:0; combat:true; size:0.68; y:-151; anim2:4


Chef's Hat
-

This is a warning if you have your chef's hat on.


Import String:
Version:4.9; icon:achievement_profession_chefhat; buffname:[46349]; bufftype:22; alpha:0.25; owntex:true; isResting:0; mine:true; y:17; texmode:2


Friday, June 12, 2009

In the Hunter's Sidecar!

A couple of my guildies have the Mechano-hog motorcycle mount, and we've had fun driving around together in them, making comments from the sidecar like "VROOM VROOM!" and "beep beeeeep!" and pretending to run over other guildies. /flee!

Now, I've not found a way to jump in the sidecar while in one of the druid shapeshift forms, but during the Noblegarden, we discovered that you could ride in the sidecar as a rabbit, and you'd lay eggs along the ground as the driver drove you around! Remembering that, I decided to see if I could try a different shapeshift...


WOOF!! I don't quite fit and my graphic just stood in place on top of the sidecar, but I was able to ride around on the sidecar when shape-shifted with Rituals of the New Moon! Now if only the hunter's own pet wolf, Roflwolf, could learn how to ride like that.

TY Grommsol for always humoring my goofiness :D

Thursday, June 11, 2009

Dual-spec Macros: Resto/Balance

With the addition of the dual-spec feature, at some point came the addition of the [spec:x] modifier for macros. I only recently discovered it, and wish that I had noticed it earlier!

The following macros are tweaks I have done to macros I posted earlier, with the [spec:x] modifier added in to allow the macros to switch spells based on my spec.
  • [spec:1] is my cow's primary spec, restoration.
  • [spec:2] is my cow's secondary spec, balance.
  • Change the numbers for your own spec, as appropriate!

resto-Swiftmend/balance-Nourish + Regrowth Toggle:
This is a macro I have keybound for "e" when not in moonkin form.

/stopcasting
/cast [mod,spec:2] Starfire; [mod,@mouseover,help] [mod,help] [mod,@player] Swiftmend; [@mouseover,help] [help] [@player] Regrowth

  • Primary Spec: if a modifier key is held, it will cast Swiftmend on friendly mouseover target, friendly target, or else on self.
  • Secondary Spec: if a modifier key is held, it will cast Starfire instead.
  • Otherwise, it casts Regrowth on friendly mouseover target, friendly target, or else on self.


Healing Touch / Nature's Swiftness:

This is a macro that I have keybound as "2" on both of my druids.

#show [spec:1] Nature's Swiftness
/stopcasting
/cast [nomod,combat,spec:1] Nature's Swiftness
/cast [help,@mouseover,exists] [help] [@player] Healing Touch
/script UIErrorsFrame:Clear()

  • Secondary spec: it will never attempt to cast Nature's Swiftness, only Healing Touch.
  • Primary Spec: casts Nature's Swiftness + Healing Touch on friendly mouseover target, friendly target, or else on self.
  • If any modifier key (alt, ctrl, or shift) is held or if you are NOT in combat, then it will not cast Nature's Swiftness.
  • If Nature's Swiftness is on cooldown, it will still attempt to cast the Healing Touch.


Tree Form / Nourish Mouseover or Moonkin Form / assisted Starfire:
This is a macro I keybound as "t" for my caster druid.

/cast [noform:5,nomod:shift,spec:1] Tree of Life; [noform:5,nomod:shift,spec:2] Moonkin Form
/stopmacro [nomod:shift,noform]
/cast [spec:2,@focustarget] Starfire; [@mouseover,exists,help] [help] [@player] Nourish

  • If you are not already in Tree Form or Moonkin Form, it will put you in the appropriate form.
  • Secondary spec: if you are in Moonkin form, it will assist your focus target to cast Starfire.
  • Primary spec: if you are in Tree form, it will cast Nourish on your friendly mouseover target, else on yourself.
  • Shift-click to cast Nourish or Starfire (assisted from focus target) regardless of form.


Feral Charge/WG/Starfall:
This is a macro I keybound to a G15 key (G12, specifically) on both of my druids.

#showtooltip
/cast [form:1] Feral Charge - Bear; [form:3] Feral Charge - Cat;
/stopmacro [form:1/3]
/cleartarget
/cast [spec:2] Starfall;[@mouseover,exists,help] [help] [@player] Wild Growth
/targetlasttarget

  • Bear form: it will cast Feral charge - Bear.
  • Cat form: it will cast Feral Charge - Cat.
  • Primary Spec: if you are in neither cat nor bear form, it will cast Wild Growth. Contains the cleartarget for fixing the "no target"/"out of range" bug.
  • Secondary Spec: if you are in neither form, it will cast Starfall.


Faerie Fires with Cooldown Monitors:
While technically keybound to "y" on both of my druids, I rarely stretch to press that key in combat, and usually just mouse-click this on my screen. It has a place on my screen because it contains so many useful cooldowns to monitor.

#showtooltip
/cast [mod:shift,form:3] Tiger's Fury; [form:1/3] Faerie Fire (Feral)(); [button:2,harm,spec:2] Insect Swarm; [mod:shift,spec:1] Swiftmend; [mod:alt,spec:1] Nature's Swiftness; [mod:shift] Force of Nature; [mod:alt] Typhoon; Faerie Fire


A note on "Cooldown Monitor" Macros:

You can see here how I use such "cooldown monitor" macros. I have 4 of them (5 if you count a separate feral one that replaces the Fire macro when in cat/bear on my feral druid) arranged in a square very close to my center screen, and then a smaller bar that includes my quick consumables and/or trinkets as applicable.


Each of the 4 big actions will change to show a different ability when I press shift or alt (I use ctrl for ventrilo), and many are specific to a form or--now that I found out about the [spec:x] modifier--my spec! The vast majority of my abilities are keybound, however, including many of the cooldowns crammed into these monitor macros. Aside from being a few click-uses, these monitors are a great way to quickly check the cooldown on an ability without having too much screen clutter!

The timer floating above the macros is from Debuff Filter and shows my current stacks of the Illustration of the Dragon Soul trinket. The health/mana bars are IceHUD. For a full run-down of my mods, click here!

Wednesday, June 10, 2009

U10: With Open Arms

Kologarn


This achievement is not a true hard-mode, but is fun nevertheless.

The general strat for this fight is pretty simple and very similar to the normal version, it's just a major DPS race against having too many raiders die to getting crushed. I actually found that this achievement was more difficult than Disarmed, because when doing Disarmed, you can actually save all of those getting squeezed. The general idea of this achievement is to just straight dps down Kologarn himself, ignoring his arms. There will be no adds to worry about!

Group makeup:
  • 1 tank
  • 2x healers
  • Mix range/melee dps
  • A hunter or shaman for Nature Resist


Positioning:
We like to arrange ourselves in a rough "u" shape around the room, leaving the hallway clear for eyebeams. When anyone gets eyebeams, they run out into the middle and then out through the hallway, which has plenty of space for them to flee without getting cornered by the beams. Since the MT will never get eyebeamed unless something is seriously wrong, you CAN have someone (such as a healer) stand at the apex of the horseshoe shape, behind the tank, far enough away that any eyebeams on this person will not hit the tank.

If anyone in your raid has a nature resist aura (hunters, shaman), have them put it up!


Stone Grip:
Raiders are very likely going to die in your attempt. The arm will grab and slowly crush whoever is in its hold, and without the group actually killing the arm, your raid's "squishies" are not likely to survive it, especially with only 2 healers (adding a 3rd healer will hurt your dps, and this whole achievement is a dps race against the stone grips!). Use battle-resses for these deaths, and save any soulstones to be cast mid-combat when a squishy is grabbed.

The grip can be healed through, so both of your healers should be dual-healing both the current tank and those who are gripped (plus the raid-wide damage from the left arm's aoe). Those with higher health and mitigation are more likely to survive than, say, mages. DPS should swap to lightly dps the arm to free the players (150k damage), but they will need to stop the moment the player is freed! Do not risk killing the arm and loosing the achievement! If you know you can resurrect the person after they die (ahem... sorry shaman...), it may be preferable to just do so, rather than risk having the arm die and spoil your achievement.

Ressed players should time their popups so that they do not coincide with the AoE from the left arm's Shockwave.


Ding Achivement!
Progress with as much DPS on Kologarn as possible, as it is simply a race against time as players die to stone grips or are released through damage to an arm that you can't, for the achievement, kill.

Your raid may feel a desire to attempt, towards the end of the fight, to just kill both arms at once and get the Disarmed achievement instead. Beware: if Kologarn is at 15% health or less, he will die immediately upon the destruction of one of his arms, and then you will get neither achievement!

Tuesday, June 9, 2009

U10: Heartbreaker

XT-002 Deconstructor


This is how my guild managed this achievement without a Bloodlust/no shaman. Note: this is a ten-man strategy guide, though the layout can certainly be used with a heroic-size raid.

Our Makeup:
  • Prot Pally
  • Arms Warrior
  • Feral Druid
  • Blood DK dps
  • Ret Pally
  • Survival Hunter
  • Destro Warlock
  • Fire Mage
  • Holy Priest
  • Resto Druid

Positioning:


Rough outline of group positioning: tank at the base of the stairs, melee at the boss' back, ranged dps clustered farther behind, with healers shuffling themselves in between to stay in range of those running into the bomb zones.

In our normal kills, we liked tanking him at the top of the stairs towards the portal into the antechamber, as it made a longer path for the adds to be killed before they would reach the raid/boss. The downside to this strat is the LoS to healers around the stairs and the columns at the base of the stairs' railings--something we adapted to in time.

For the Heartbreaker Hardmode, killing XT-002's heart will stop the junk-pile adds from being spawned, which means that tanking him at the bottom of the stairs is preferable to reduce any chance of LoS issues. This is important, because in place of having the adds spawn, breaking XT-002's heart will result in several new "fun" abilities being used against the raid!
  • Light bombs will now spawn a Life Spark, which must be avoided as it damages all players around it. These must be killed by 1-2 of your ranged dps (we assigned the hunter and warlock to these).
  • Gravity Bombs will now spawn a Void Zone like those seen in the early trash of Drak'Tharon Keep (dark black holes on the ground.) They last for 3 minutes, so these just need to be avoided.
  • XT-002's own damage is increased by 40%, and guess what: he's gonna be throwing tantrums with it!

Killing the Heart
:
This should be done the first time the heart is dropped at 75% health, which is about 30-45 seconds into the fight. Waiting until the 2nd or 3rd drop (at 50% and 25% health respectively) to kill the heart may force you up against the enrage timer, so if you miss it on the 75% drop, just wipe and reset. If you have the dps to kill the heart without a bloodlust, though, you shouldn't have any problems with the enrage timer, and it would probably be okay to try again at the 50% mark!

DPS should go all-out, pop all cooldowns, to get this thing killed. As long as healers have topped everyone off/thrown enough HoTs to top everyone off, they should assist in DPS, too. If your raid is strong enough, you CAN kill the heart without having a bloodlust!

Resto Druids: I popped a faerie fire on the heart as soon as it dropped to increase the raid's dps against it. Doing so cut that GCD out of the feral druid's own rotation, allowing him to power through without having to cast Faerie Fire himself!

If you have revitalize, keep a rejuv ticking on any kitties, rogues, and DKs (maybe warriors too, if they look low on rage) to assist with power regen. They will need all that they can to provide the dps needed for this achievement!


Add Cleanup:
Adds are ignored while the heart is dpsed down. Once the heart is destroyed, XT-002 resets to full health, so him picking up the repair bots is not an issue: let him suck them up while your raid takes care of the boombots and pummelers. We were lucky and didn't have a pummeler spawn on our actual kill, but when one did on prior attempts, the MT would pick it up and tank it as dps killed it. Once all of the adds are cleared, you can settle into the long-haul of killing the boss.


Light/Gravity Bombs:
These will still be cast, and as mentioned earlier, they now have additional abilities after they wear off of the afflicted player. It is important for your raid to stay clustered around the middle of the room, leaving the sides clear for those players with bombs on them (designated Bomb Zones in the diagram).

You can specify that gravity-bombed raiders go to one side and light-bombed to another, but we found it easiest to just let them go to whichever side was closest at the time. This split the number of void zones fairly evenly, keeping them from piling up on one side to make a giant shadowy mine field, and also prevented any confusion when one person got both bombs applied to them consecutively! For 25-man, I recommend being more strict about which side each bomb type will go, since there are more people getting bombed.

1 or 2 ranged dps (for 10-man) should be assigned to killing the life sparks that spawn after light bomb explodes off of a player. Those afflicted with the light bomb must run away from the life sparks quickly, just as those afflicted with the gravity bomb must quickly evacuate from the void zone.

In both bomb cases, players must be especially aware to remain within range of one or both healers. If the tank gets a bomb on them, melee should clear away from them and wait it out.
  • Note: if your dps has trouble getting the life sparks down quickly, Beruthiel of Falling Leaves and Wings suggests having one of your more durable melee (feral druid, DK, etc) taunt/grip the life sparks to pull them away from the raid, to keep them from causing additional damage to the raid as a whole.

Tantrums:
These are the hardest part of the Heartbreaker hardmode, as they did lots of damage in the non-hardmode and now do 40% more. He will tantrum roughly once per minute. All players should pop whatever shields/damage reductions/absorptions that they can to help mitigate the damage done by the tantrum; multiple AoE healers will be useful for this, and dps classes who can heal should assist as necessary, particularly if someone is currently afflicted by a bomb while the tantrum is going off.

Druids: Barkskin should be up every time he tantrums. Use it!

Resto Druids: Save your cooldowns for tantrums. Conserve Nature's Swiftness for a true emergency, and make sure your hots don't drop off of the MT. Mana should not be a problem at all in this fight since it will be relatively short, but do keep an eye on your mana levels if they get low. Make sure you innervate ahead of a tantrum if it's needed, so that you don't waste a GCD on an innervate that could've gone to a heal. Use your Wild Growth wisely so that it will splash on as many people as you can!


~~Rinse-repeat through this damage while the remaining dps not assigned to sparks whittle down the boss, and you will have yourself a deconstructed Deconstructor, complete with a broken heart!~~